User_Manual
- Installation and running
-
Basics
- Creating new database
- Using existing database
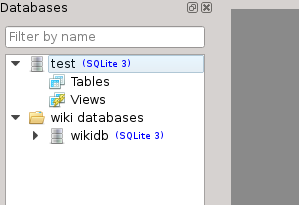
- Managing database list
- Executing SQL queries
- Creating and editing tables
- Creating and editing indexes
- Creating and editing triggers
- Creating and editing views
- Moving and copying objects between databases
- Exporting schema and data
- Importing data
- Useful keyboard shortcuts
- Configuration dialog
- Command line options
- SQLiteStudio configuration file
- SQLiteStudio updates
- Advanced usage
- Command line interface (CLI)
- Troubleshooting
| Platform | Status | Binaries provided | Notes |
|---|---|---|---|
| Windows (32bit) | Supported | Yes | |
| Windows (64bit) | Supported | Yes | |
| Linux (32bit) | Should work, not tested | No | |
| Linux (64bit) | Supported | Yes | |
| Mac OS X (ARM / M1) | Should work, not tested | No | |
| Mac OS X (ix86 64bit) | Supported | Yes | |
| Mac OS X (ix86 32bit) | Not supported | No | |
| Mac OS X (PowerPC) | Not supported | No | |
| FreeBSD | Should work, not tested | No | |
| Solaris | Should work, not tested | No | |
| Other operating system | Not supported | No |
See Compiling application from sources.
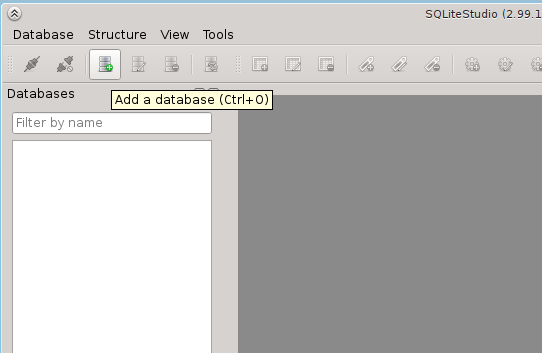
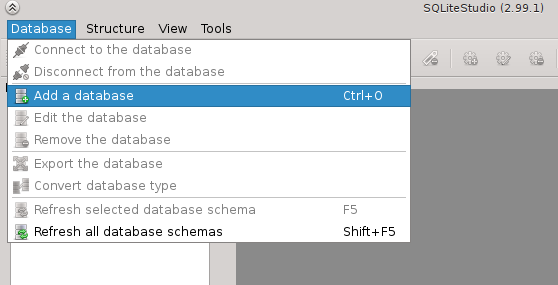
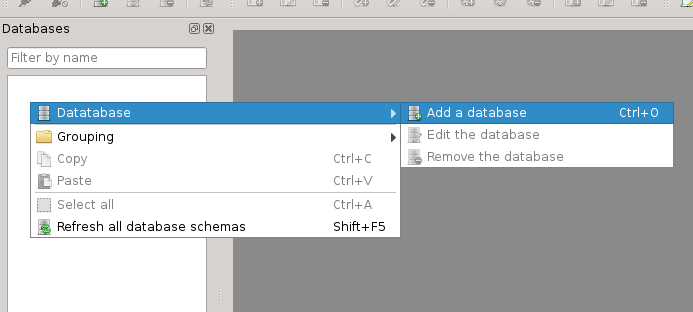
You can create new database in three ways:
- Click on toolbar button:
- Click on main menu entry:
- Right-click on database list and pick entry from context menu:
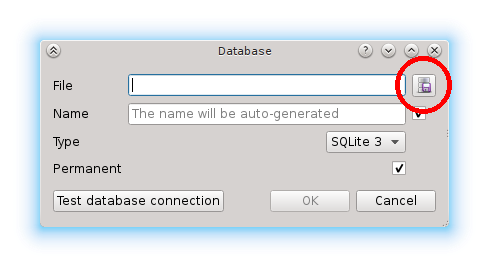
Then the database dialog will appear:
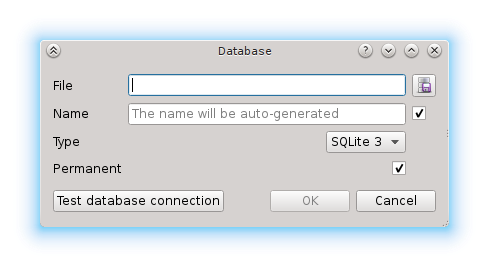
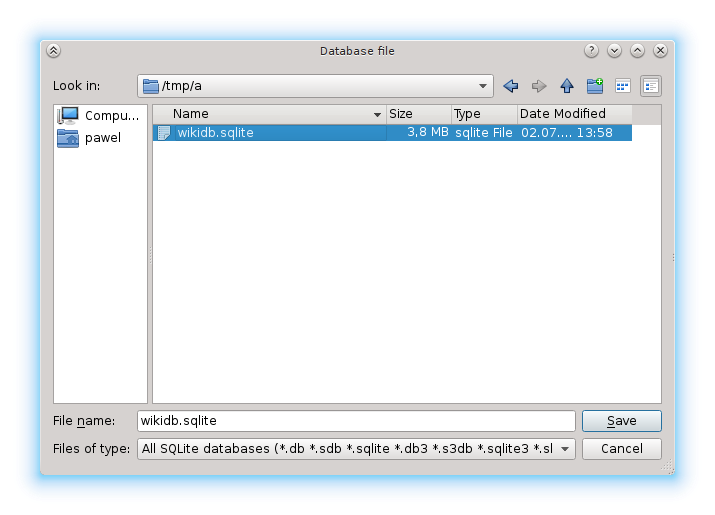
Click on the browse button:
You will see filesystem browsing dialog (this may look different on various operating systems):

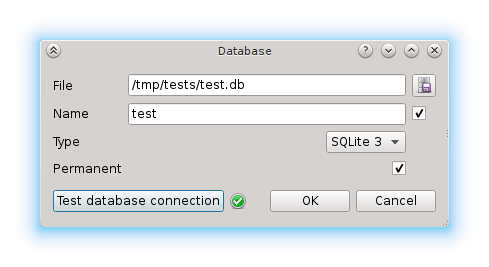
In this dialog go to directory where you want to create your database and type in the file name for your database (on the image above it's "test.db"). Click "Save". Now the database dialog has file name and database name filled in. You can change the name to whatever you want (in which case you have to disable the checkbox on the right hand side), or just leave it as it is.
The database name is just symbolic name, an alias used by SQLiteStudio to present database in the list. You can pick any name you want, it just has be unique in context of databases already added to SQLiteStudio.
You can press "Test connection" to make sure that your database file can be created in specified localisation (in regards of directory permissions, free space, etc). If everything is okay, than you will see green icon next to it:
If there was any problem, the red icon will appear.
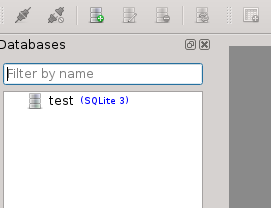
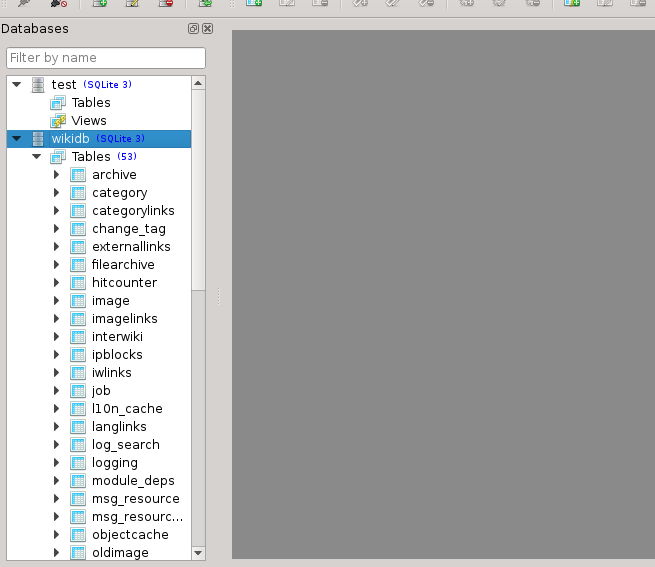
You can now press "Ok" to create the database. You will see it in the databases list on the left:
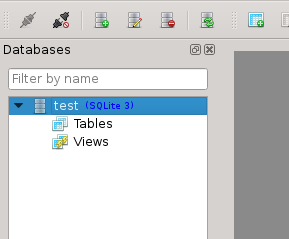
Double-click to open it:
You may have noticed the "Permanent" check in the database dialog:
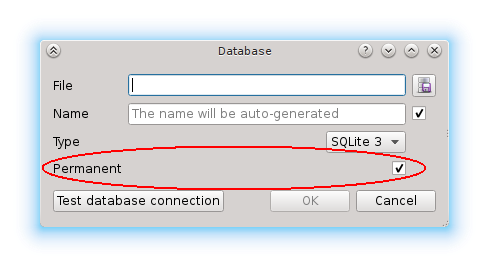
When this option is checked, then the database is added permanently to SQLiteStudio. This means that when you close SQLiteStudio and start it again, the database will remain on the list.
If this option is not checked, then the databases will disappear from the list after SQLiteStudio was restarted.
Adding an existing database to the list is very similar to creating new database.
Repeat steps from above, util you see database dialog:
Then you click (just like before) on browse button:
In the file browsing dialog pick an existing database file:
Then click "Save" and "Ok" in next dialog and your database will be added to the list. You can double-click on it to open it:
Alternatively you can use drag&drop mechanism: drag database file from your file manager and drop it onto the database list, then confirm the database dialog.
You can edit database details at any moment. Just right-click on it and pick "Edit database" from context menu. The standard database dialog will appear.
Changing database's name is allowed as far, as the new name is unique across all databases being currently on the list.
The database name is just symbolic name, an alias used by SQLiteStudio to present database in the list.
When changing database file path, it will mean that under the same name you will access the new database file. It will not copy nor move the old database file to new location.
When editing database details it's not possible to change it's type (SQLite2, SQLite3, or any other), because this is allowed only when creating new datababase. If you want to convert one SQLite version into another, use database conversion dialog.
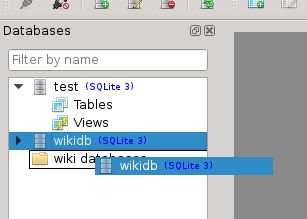
You can move databases up and down with mouse "drag & drop". You can create virtual "directories" where you can group databases. It helps maintaining big number of databases on the list.
To create a group, right-click on the databases group and pick "Grouping" → "Create group". Then you can drag & drop databases into that group:
Groups can be nested.
If you right-click on the database and pick "Create group", then the clicked database will be automatically moved into the group after the group was created.
To delete database from the list, select the database and either:
- right-click on it and pick "Remove database",
- or press "Delete" from the keyboard.
You will be asked for confirmation, before the database is actually removed from the list.
Deleting database from the list does not delete database file! It only removes it from the list of databases in SQLiteStudio. There's no way to delete actual database file using SQLiteStudio. This is for safety reason - if you really need to delete the database file, do it using your operatins system utils (file manager, command line, ...).
To execute any SQL queries on SQLite database you have to open SQL Editor window:
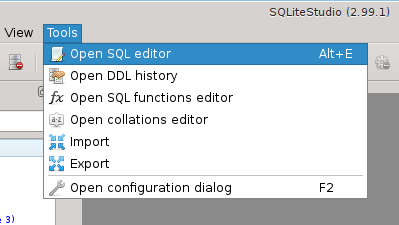
You can find it also in the "Tools" menu:
It's also available under keyboard shortcut "Alt+e" (by default, can be changed).
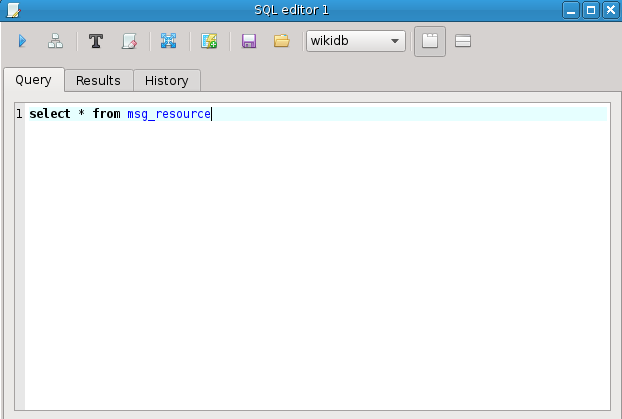
The SQL editor has a upper text edit for entering SQL queries and lower view for displaying results of the query:

If you prefer to have query edit field on one page and results on another page, you can switch it very quickly from toolbar:

And in the result you get 3 tabs in the editor, instead of 2:

- 1st button (
 ) executes query the you typed in the query text field below.
 - 2nd button (
 ) executes
 EXPLAINstatement for the query below. - 3rd button (
 ) uses currently configured SqlFormatterPlugin to format queries typed below.
 - 4th button (
 ) clears query execution history (available in the last tab of the SQL Editor window).
 - 5th button (
 ) opens Export_dialog for exporting results from query typed below.
 - 6th button (
 ) creates view from the
 SELECTquery typed below. - 7th button (
 saves contents of the query text field below into the file.
 - 8th button (
 ) loads contents of selected file into the query edit field below.
 - 9th position is a combo box, where you can pick current working database for the SQL Editor window. All queries are executed on database selected in this combobox.
- 10th and 11th buttons (

 ) are a shortcut to configure SQL Editor results presentation mode - in separate tab, or below the query field.
The list may differ if any plugin adds its own buttons to the toolbar.
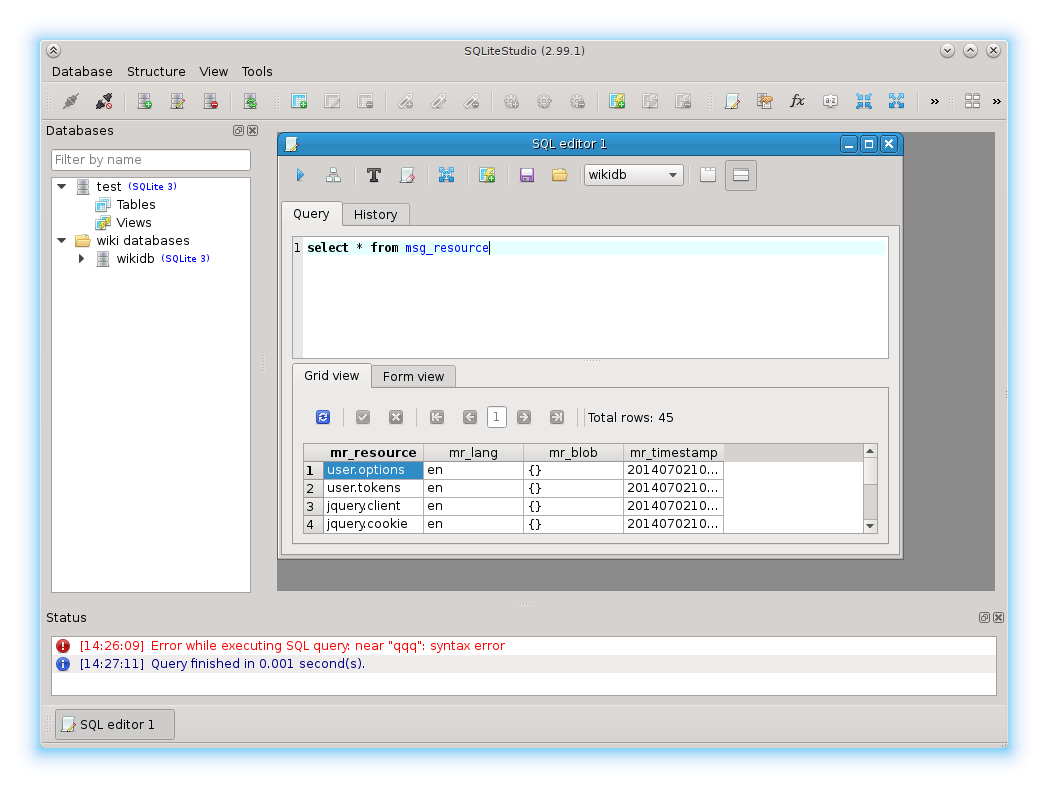
When you type SQL query in the editor, it will highlight SQL syntax, but also if you type the correct name of any object (that is existing table, index, trigger, view, database or column name), the name gets highlighted with blue color (by default, it's configurable):
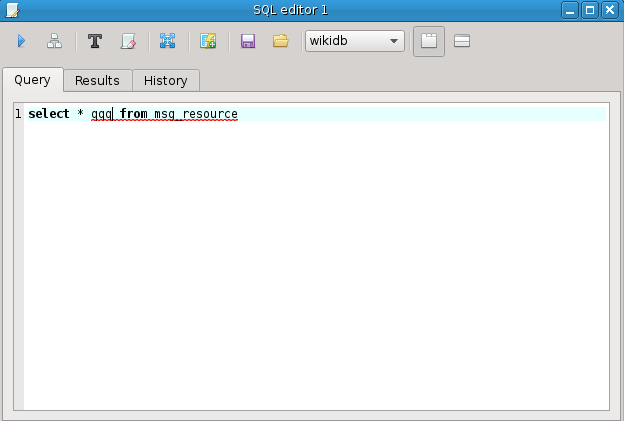
If you use incorrect SQL syntax, the problematic part will be underlined with wavy line:
To execute the query, use toolbar button , or keyboard shortcut "F9"
(the shortcut is configurable).
Error handling is done by static syntax analysis, therefore there's a chance that some errors are detected by mistake. If you think that the marked error is not really the error, you can execute query and SQLiteStudio will not analyze it. Instead it will put query directly to SQLite driver to execute it. If it was indeed correct, then it will return data, but for such cases SQLiteStudio is unable to extract metadata from query and results will not be editable. Only queries that were not marked with error marker will return full metadata and results will be editable. This limitation also affects transparent database attaching.
Even SQLiteStudio claims that the syntax is incorrect, you can still try to execute the query:

In this case, the query was invalid, obviously.
Now, let's get back to correct query (remove the "qqq" from it) and also switch the results presentation mode, so results are displayed below query, not in separate tab:
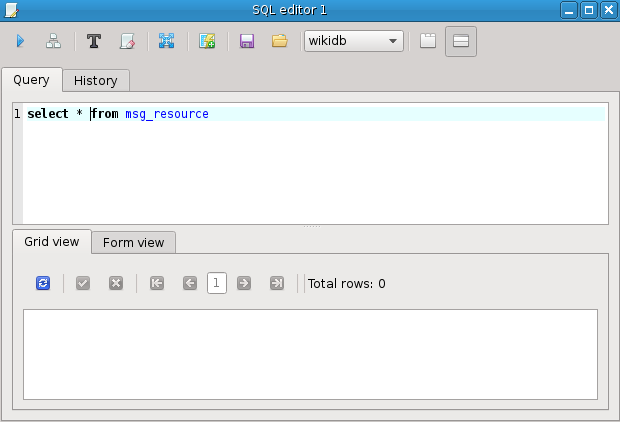
Execute the query:
The results appeared in the view below the query and the proper execution status message appeared in the bottom status area.
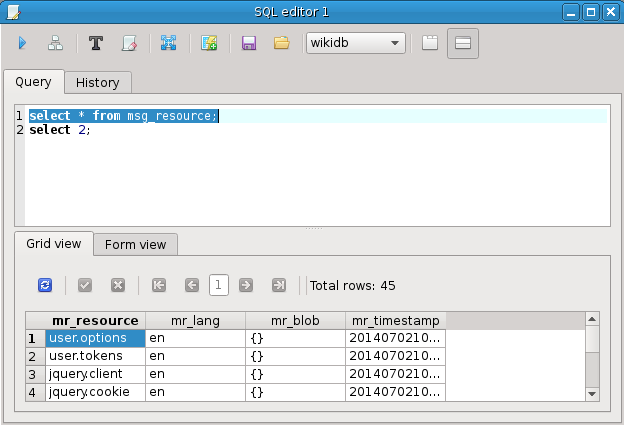
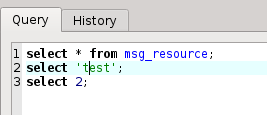
You can type multiple queries, one after another, just separate them with semicolon. In this case SQLiteStudio will execute all queries types in the editor, but will present only results from the last query:

If you want to execute only one query (even more queries are typed in), select that query and then press "Execute":
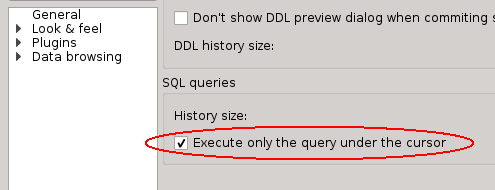
The behaviour of executing all queries typed in is a default, but you can change it, so only query which the input cursor is currently at is executed. To do so, open configuration dialog (button  _on_main_toolbar), go to "General" page and enable this option:
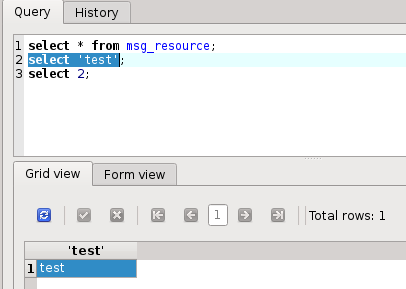
From now on whenever you hit "Execute" in SQL Editor, only one query will be executed, the one under input cursor:
In this mode, after you execute current query, that entire query will be selected, so you can be sure what query exactly was executed:
SQLiteStudio provides code assistant, so it can help you with the SQL syntax. When you hit Ctrl+Space (it's a configurable shortcut), it will show you all possible values for the current cursor position. Let say you typed "SELECT c" and hit Ctrl+Space:
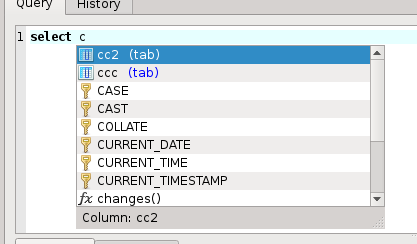
You can see it shows only valid entries that start with the letter "c". Let's pick "ccc", then ask the assistant about next suggestions:
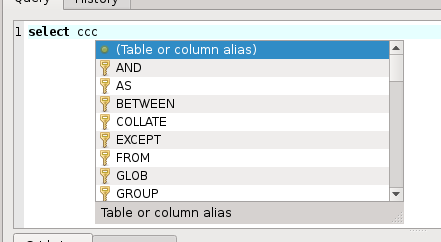
First position (with a bullet icon) is a pseudo value, which tells you that you can put an alias name for table or column here. You typed "ccc" before, which is a column name, so here you could type an alias name for it. We won't do that. Instead we pick "FROM" and add "tab where" and ask the assistant again:
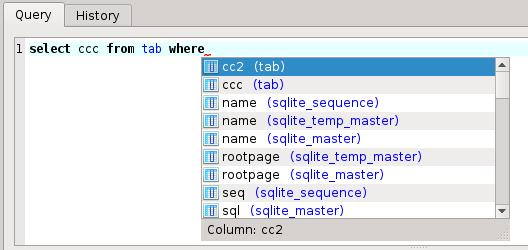
The assistant proposes several columns which you can use in your "where" clause, but notice, that columns from "tab" table are listed at the begining, as you use that table in the query already. This is how the assistant tries to be smart with proposing values - when they are more likely to be used in the context, it will list them at the top.
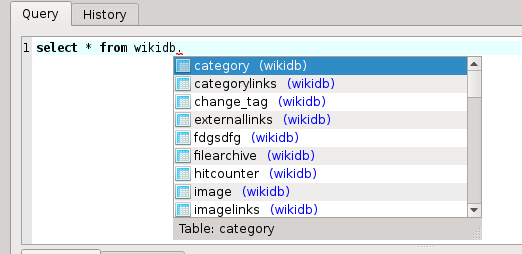
The assistant is triggered manually by the keyboard shortcut mentioned above, but it also triggers automatically when you type "name.", where the name is name of existing database or table. In following example I didn't use keyboard shortcut, this just appeared after I types "wikidb.":
There's a small problem with the assistant on Linux with KWin composition enabled, which causes the assistant to show up with a small delay (about half a second). The root cause of this problem is not yet identified. If it bothers you, disabling composition in KWin fixes this issue.
SQL history tab keeps the history of SQL queries you have ever executed. The number of queries kept in history is configurable in Configuration dialog and defaults 1000 entries. When that limit is exceeded, the oldest entry gets deleted.
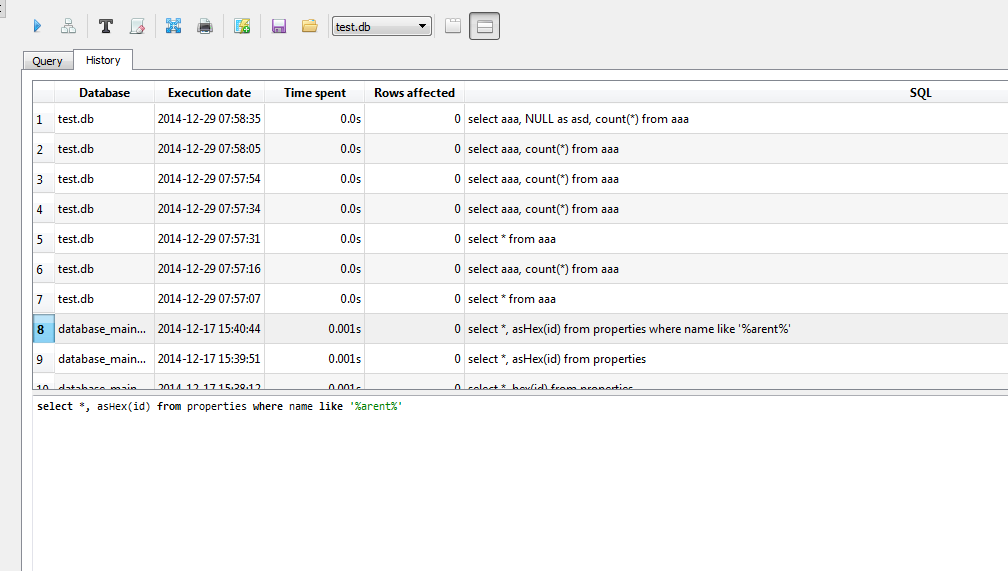
You can browse and preview queries from the history. Double-click on the entry to automatically copy it into SQL editor, so you can re-execute it.
You can erase entire SQL queries history by clicking on "Erase history" toolbar button and confirming your choice.
SQLiteStudio defines several SQL functions in databases that it connects to, so you can use them as long as you execute queries from withing SQLiteStudio.
Functions registered by SQLiteStudio are available only from SQLiteStudio. They will not be available in other applications connecting to the database, unless those applications define such functions by themself
| Function | Description |
|---|---|
| regexp(pattern, arg) | Matches arg against pattern, where the pattern is a regular expression. This also makes the REGEXP operator available in SQL queries. Returns 1 on match, or 0 when arg was not matched. |
| sqlfile(file) | Reads given file as text file containing SQL queries and executes all those queries. Returns first column of first row from results of the last query executed from the file. |
| readfile(file) | Reads given file as binary file and returns bytes from it. |
| writefile(file, data) | Writes given data bytes into given file. Returns number of bytes actually written. |
| langs() | Returns list of scripting languages available in SQLiteStudio at the moment (this depends on what scripting language plugins are currently loaded). |
| script(language, code) | Evaluates given code using scripting plugin that supports given language and returns result of the evaluation. Use langs() function to learn supported languages. |
| charsets() | Returns list of charsets supported by SQLiteStudio (to be used for example in arguments for import() function) |
| import_formats() | Returns list of importing formats supported by SQLiteStudio (depends on import plugins being loaded) |
| import_options(format) | Returns list of currently used importing settings for certain format (the format must be one of formats returned from import_formats()). Each setting in a separate line. Each line is a setting_name=setting_value
|
| import(file, format, table, charset, options) | Executes importing process using file for input, format for choosing import plugin (must be one of values returned from import_formats()). The import is done into the table. If table does not exists, it will be created. The charset is optional and must be one of values returned from charsets() (for example 'UTF-8'). It defaults to UTF-8. The options is optional and has to be in the same format as returned from import_options() (which is one option per line, each line is option_name=value), although it's okay to provide only a subset of options - then the rest of settings will remain. |
| html_escape(string) | Replaces HTML-specific characters in the string with their HTML escape codes and returns modified string. For example '<' will be replaced with '<'. |
| url_encode(string) | Replaces URL-specific characters with their percent escape codes and returns modified string. For example '/' will be replaced with '%2F'. |
| url_decode(string) | Replaces percent escape codes of the URL with their actual characters and returns modified string. For example '%2F' will be replaced with '/'. |
| base64_encode(data) | Encodes given bytes with BASE64 encoding and returns BASE64 string. |
| base64_decode(data) | Decodes given bytes from BASE64 encoding and returns decoded bytes. |
| md4_bin(data) | Calculates MD4 hash function for given data and returns calculated value as bytes. |
| md4(data) | Calculates MD4 hash function for given data and returns calculated value as hexadecimal string. |
| md5_bin(data) | Calculates MD5 hash function for given data and returns calculated value as bytes. |
| md5(data) | Calculates MD5 hash function for given data and returns calculated value as hexadecimal string. |
| sha1(data) | Calculates SHA-1 hash function for given data and returns calculated value as bytes. |
| sha224(data) | Calculates SHA-224 hash function for given data and returns calculated value as bytes. |
| sha256(data) | Calculates SHA-256 hash function for given data and returns calculated value as bytes. |
| sha384(data) | Calculates SHA-384 hash function for given data and returns calculated value as bytes. |
| sha512(data) | Calculates SHA-512 hash function for given data and returns calculated value as bytes. |
| sha3_224(data) | Calculates SHA3-224 hash function for given data and returns calculated value as bytes. |
| sha3_256(data) | Calculates SHA3-256 hash function for given data and returns calculated value as bytes. |
| sha3_384(data) | Calculates SHA3-384 hash function for given data and returns calculated value as bytes. |
| sha3_512(data) | Calculates SHA3-512 hash function for given data and returns calculated value as bytes. |
In the Grid view of the data you can start editing values by:
- double-clicking on the cell (old value will remain and will be initially selected),
- selecting the cell and pressing Enter key (old value will remain and will be initially selected),
- selecting the cell and simply start typing the new value (old value will be overwritten immediately),
- right-clicking on the cell and selecting "Edit value in editor" from the context menu (value will be edited in the separate dialog window).
Any changes you make to data are not commited immediately to the database. You have to commit them manually by clicking "Commit" on the toolbar, or hitting "Ctrl+Enter" keyboard shortcut (the shortcut can be changed in Configuration dialog.
If you decide to drop any changes to data you made, click on "Rollback" on the toolbar, or hit "Ctrl+Backspace" keyboard shortcut (it's also configurable).
You can selectively commit/rollback cells (to commit/rollback only some of current changes). To do so, select cells you want to commit/rollback and right-click on them. You will see "Commit selected cells" and "Rollback selected cells" positions in the context menu.
In the Form view of the data you can edit values of a single row at the time. Each cell from the row is represented here as a tabbed view/editor. By hitting "Commit" or "Rollback" in the Form view you commit/rollback only the current row.
The Form view operates only on rows currently visible in the Grid view, so when you reach the last row from the grid view and you want to edit next rows, you need to switch back to the Grid view, go to next data page and then go to Form view and continue your work.
Note, that before changing pages in Grid view you have to commit/rollback your current changes to the data, otherwise they will be lost.
If the column edited is of "BLOB" type, a separate value editor dialog will open. Editor dialog has several tabs where you can view and edit data using different modes (textual, binary, etc). The same dialog will open if you right-click on the cell and select "Edit in value editor".
The same data editors/views are used on the Form view, so if you plan to edit all column using the value editor, you may just as good switch to the Form view.
Value editor can be configured, so it uses certain editor/view modes for the certain column datatype. To do so, use an icon on the right side of the editor view: 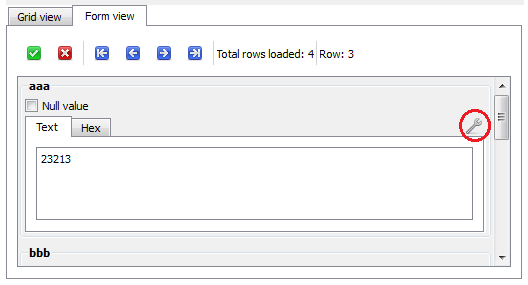
On the left side of the configuration you see the list of datatypes recognized by value editor, where you can select the datatype you want to configure. On top-right area you can see list of all available editor widgets (they are provided by plugins, so the list depends on what plugins you have currently loaded, but many plugins are already built into application). On bottom-right area you have a sample of how your current configuration for selected datatype look like. You can also drag&drop editor tabs to change their order. The left-most editor is a default editor for that datatype (which means that the left tab is always open first for that datatype). 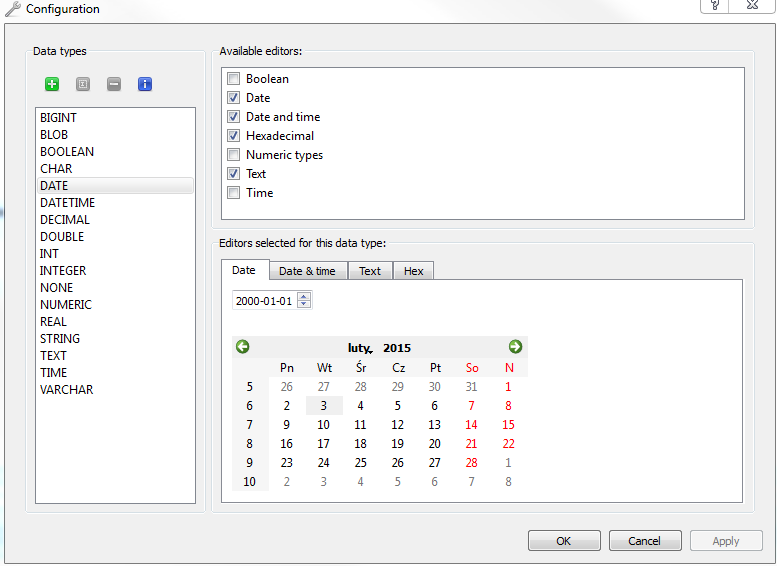
If there's a datatype not specified in the configuration list and you step into that type somewhere in your database, SQLiteStudio will pick default editors (Text and Hex).
Transparent attaching feature in SQLiteStudio is an ability of calling ATTACH and DETACH automatically by SQLiteStudio whenever it's necessary. You can enter your SQL query in SQL editor using tables from several different databases, using database names as presented on databases list: ![]()
Since transparent attaching calls ATTACH and DETACH internally, it's affected by all limitations that apply to those statements. That is no support for attaching databases of different type. It means that you cannot mix SQLite 2 and SQLite 3 databases in the single query, or any other database type mix ups.
TODO: remember about multi-column sorting TODO: explain difference between column constraints and table constraints
PRIMARY KEY constraints
'''FOREIGN KEY constraints '''
''' NOT NULL constraints '''
''' UNIQUE constraints '''
''' COLLATE constraints '''
''' CHECK constraints '''
''' DEFAULT constraints '''
''' PRIMARY KEY constraints '''
''' FOREIGN KEY constraints '''
''' UNIQUE constraints '''
''' CHECK constraints '''
Here's a list of options that can be passed as arguments when running SQLiteStudio. Those options are valid only for the GUI application, for CLI there is separate set of options (click CLI to see details).
| SQLiteStudio options |
|---|
| -h, --help |
| -v, --version |
| -d, --debug |
| --debug-stdout |
| --debug-lemon |
| --debug-sql |
| --debug-sql-db |
| --list-plugins |
| --master-config |
| SQLiteStudio arguments |
|---|
| file |
Entire SQLiteStudio configuration is stored in a single SQLite3 database file. More details at Configuration directory location page.
Automatic updates perform:
- updates availability check,
- updates downloading,
- updates installing.
Automatic updates work only for a Portable distribution. If the application was installed from Linux's package manager, it's the responsibility of that package manager to update the application.
The updates availability check is always performed at application startup, but it can be disabled by the user (and re-enabled in configuration dialog). It can also be manually triggered by the user from menu Help / Check for updates. User is always asked for confirmation before downloading updates.
Installation of updates might require administrator privileges. If so, SQLiteStudio will ask user for password (on Linux and MacOS X), or for confirmation of privileged operation (on Windows).
HTTP proxy is not supported as for now, so if your HTTP connection requires proxy to be configured, then automatic updates will not work for you. Support for proxy configuration is planned in future versions.
Manual update is simply about downloading the fresh version from the download page and replacing old version with it.
SQLiteStudio allows user to create additional SQL functions to be used in SQL queries. You can create for example function "test123()" which will return a random string for you and you will be able to type:
INSERT INTO myTable VALUES (test123());Custom SQL functions in SQLiteStudio are very useful if your application uses some custom SQL functions for itself and you want to be able to emulate your application's environment in SQLiteStudio, so you can execute similar queries on the database.
Other use case is when you want to simplify some database maintanance tasks. Creating function which does some more complicated operations using some simple input values can be treated as a procedure by SQLite, because you can execute it with:
SELECT functionName(input_arguments);To create/edit/delete SQL functions, open Custom SQL Functions editor: 
In the functions editor you need to define few of things:
-
Function name. It needs to be unique.
-
Is your function goind to be Scalar or Aggregate?
- Scalar functions are those applied to every single data row separately. Example of such function is "
length()". - Aggregate functions are used together with
GROUPBYclause and they are applied to the entire result set. Example of such function is "min()".
- Scalar functions are those applied to every single data row separately. Example of such function is "
-
Implementation language - a programming language that you will use to define what the function actually do.
-
Input arguments - list of named input arguments. Currently they're just symbolic names used by a SQL syntax assistant to suggest what are expected input arguments. Nothing more.
-
Databases - for which databases the function should be registered by SQLiteStudio.
-
For Scalar function - a single implementation field is required. It's the code in chosen programing language that does the actual function's job. The return value of this code becomes the result of the function call.
-
For Aggregate function there are 3 implementation fields:
- Initialization code - this code is executed once, at the begining of grouped query results. You can use it to initialize some variables to "0" values, or something like that. This field is optional.
- Per step code - this code is executed for each data row from the results. Each iteration uses the same context, which means all variables are shared across all steps.
- Final step code - it's executed after last "per step" code. You can calculate the final result and releasy any resources you acquired. This code must return the result of the aggregate function.
Arguments passed to function are available in the code as a variables, whose names depend on certain implementation language you chose. For Tcl arguments are available in "$argv". For QtScript they're in "arguments" array. To learn how to handle input arguments in certain language, read about the specific plugin that provides support for that language. Offical plugins are described at Scripting languages plugins page).
Custom SQL functions created in SQLiteStudio exist only in context of SQLiteStudio. Functions are not persisted in database, it's just not how SQLite databases work. If you want to use some function in your own application, you have to register that function in SQLite from your application.
There is a collection of useful scripts maintained here on the wiki: https://github.com/pawelsalawa/sqlitestudio/wiki/Scripts_repository
Code snippets feature was introduced in SQLiteStudio 3.4.0. It allows user to define collection of code snippets that can be then used (inserted) in SQL Editor window.
To define snippets, open the Code Snippets editor either by using toolbar button:
 or from menu Tools -> Open Code Snippets editor.
To use (insert) a snippet into current SQL Editor, invoke the code assistant (Ctrl+Space by default - or Cmd+Space on MacOSX) and then, while code assistant is still active, hit the same hotkey again (Ctrl+Space / Cmd+Space). This way you will switch code assistant to another mode - for inserting code snippets. From there you can choose the snippet to insert. If you defined a "code assistant shortcut" for a particular snippet (in snippets editor), then you can hit that shortcut, while code assistant is in "snippets mode". Otherwise you just have to pick the snippet from the list in the assistant.
To add/edit/delete user's custom collation sequence, open Collations editor: 
Collation sequence is an algorithm definition that is used by SQLite to compare two values and find out if one is less/greater/equal to another. Collations can be used in several contexts by SQLite - for example table's column can be defined with a specific collation, which will affect how is sorting done for that column, how is grouping by that column done, etc. See SQLite documentation for more details.
Collation implementation is like writting custom SQL function implementation with 2 rules:
- The collation function will always be provided with exactly 2 arguments - values to compare.
- The collation function has to return -1, 0, or 1, when first argument is less then, equal or greater than second argument.
SQLite extensions are supported only in SQLite 3. SQLite documentation for details on what are SQLite runtime loadable extensions.
To load SQLite extension into SQLiteStudio database connections, the easiest way is to put it into one of directories, that SQLiteStudio scans for such extensions. You can learn these directories by going into Help -> About -> Environment -> SQLite extensions directories. Usually these are ext and extensions directories, next to plugins directory (in the SQLiteStudio installation directory).
If you put compiled SQLite extension into one of those directories, it will automatically be loaded by SQLiteStudio upon next startup. Note, that such (automatically loaded) extension will not be registered in any database, until you enable it for all or particular databases.
To enable (or just see/add/edit) SQLite extensions currently managed by SQLiteStudio, open Extension Manager: 
You can add more extension directories scanned for automatic loading by defining SQLITESTUDIO_SQLITE_EXTENSIONS environment variable (before application start) pointing to directories (it could be multiple directories, just like you would define PATH environment variable). Another option is to define extra directory during compilation of SQLiteStudio, by passing SQLITE_EXTENSIONS_DIR symbol to compiler with value of desired directory path.
Extension manager window is similar to Collation editor window. On the left side it has list (2) of extensions already registered in the application, which are loaded for defined set (or all) of databases. At the top (1) there is a toolbar, where you can add/remove extensions and commit/rollback any changes made in the manager window. Also in that toolbar there is a help button pointing to this User Manual section.

The main part (3, 4, 5, 6) of the Extension manager window will become enabled/disabled according to your current selection in the list (2) - if there is nothing selected in the list, the main part will stay disabled. When you add/edit certain extension, you need to provide path to the library file, which delivers the extension. This is what you do in the first field (3). You can use file dialog (4) to make it easier.
The initialization function field (5) is optional and should be used if SQLite was unable to initialize an extension, due to missing initialization function. As you may have read in the SQLite documentation, the initialization function name is predicted basing on the library/extension file name, so if the file name does not match initialization function accordingly, you may need to provide the initialization function manually and that's what you can do in the field (5). Otherwise you can leave it empty.
List of databases in area (6) is just like in Collations editor and Functions editor. You can define there whether certain extension should be loaded for all databases (for SQLite version 3 only) used in the application, or should it be loaded for preselected set of databases.
SQLiteStudio will try to load (probe) the extension that you're editing (while you type the file path), so you will be notified if the file is invalid/inexisting or there is any other problem (such as initialization function not found). If anything is wrong with the extension file, you will see pulsing red dot at the left-top corner of the file entry. Once you fix file path or initialization extension function name, the red dot will disappear automatically.
Remember to commit your editions. Otherwise they will not be applied.
SQLiteStudio version 3.1.x and older supports extension loading only through load_extension() SQL function executed in SQL editor.
Populating tables feature is a way to insert lots of data into tables, basing on some rules, in order to have some test data to work with. It automates inserting lots of data that have predictible values, like sequence o numbers, random numbers, random text, random numbers, etc, etc.
Populating is done using rules that are defined by Populating plugins. Each plugin has its own input arguments (like minimum/maximum values, etc) and produces set of values basing on input arguments and internal algorithms.
To populate table with data, click on "Populate table" button on Table window's toolbar. In the Populate dialog you will be able to define how many rows of data you want to produce and select which columns should be populated. Unselected columns will be populated with their default values. When selecting columns to populate, you need to pick a plugin used for populating - this determinates what data will be inserted into that column. Most plugins also have configuration available to specify some details of data production.
When managing numerous databases and doing lots of schema changes, it's useful to have a tool to track and reproduce changed made on the schema. SQLiteStudio shows the DDL preview before executing database object creation/change statements (unless this option was disabled by user). It gets the job done, but it can be clunky to copy the DDL and paste to some it to some other text file to keep the history. It's also risky, cause one might forget to copy the DDL sometimes.
That's where the DDL history window comes in. It keeps history of any DDL changes (CREATE statements, DROP statements and any other statements related to changes of database objects), regardless of DDL preview dialog being enabled or not. It keeps information about date and time of execution and database on which the DDL was executed.
Together with SQL history from SQL Editor, DDL history window makes any changes made to any database from SQLiteStudio reproducible.
To open DDL history window, click on "DDL history" button on toolbar: 
If you're looking for command line options for running main SQLiteStudio application, see Command line options.
CLI is a separate, text-only console application. See Command line interface for more details.
Report this on bugs.sqlitestudio.pl, or - if you prefere - you can do it from SQLiteStudio. Go to Help menu and pick "Report a bug".
You can also ask for help on forum.sqlitestudio.pl. Sometime there is a workaround for some bugs, so you can apply them before the bug gets fixed and released in new version.
The following applies to SQLite 2 only.
Long story short: The old SQLite 2 library is very limited in regards of data types, especially when it comes to binary data. It's better to use regular text columns and store base64-encoded data.
In more details: To be able to store binary data in SQLite 2 table, you need to define column data type as BLOB, or CLOB, so SQLiteStudio knows that you will be storing binary data in that column. Without that, SQLiteStudio is unable to write and read binary data correctly from that column.
Additionally, the SQLite 2 version has a bug, which makes storing binary data to be truncated to the first occurrence of the null byte (byte with value = 0), just like it is done for regular strings. There's nothing SQLiteStudio can do about it. Unless you store data with all non-null bytes, the only solution is to use regular TEXT based columns and store base64-encoded data.
Not sure about Windows or MacOS X, but under Linux you can use Fcitx with SQLiteStudio. Here's how to do that.
- If you are using Linux managed package:
The only thing you may need to do is to change default shortcut for SQLiteStudio code assistant (Ctrl+Space), as it is colliding with Fcitx triggering shortcut.
- If you're using Portable distribution (binary packages downloaded from SQLiteStudio's home page):
Copy platforminputcontexts/libfcitxplatforminputcontextplugin.so from your Qt installation into SQLiteStudio/platforminputcontexts/libfcitxplatforminputcontextplugin.so (you will have to create the platforminputcontexts subdirectory), restart SQLiteStudio and that's it!
In other words, what you have to do is:
sudo apt-get install fcitx-frontend-qt5
ln -s /usr/lib/`arch`-linux-gnu/qt5/plugins/platforminputcontexts/ /path/to/SQLiteStudio3/
Just remember to change the SQLiteStudio's code assistant shortcut (Ctrl+Space), so it doesn't collide with Fcitx.